Gear/Accessories/Modifiers

Old MTL – In the Dark

PT.2 – Some night and interior images from a recent photo excursion to Montreal. Fuji X20 technical note for those who care about that stuff: When I first brought the RAW files from the Fuji X20 into Lightroom, I wasn’t terribly impressed with the noise in images at or above ISO 400. However, once I reduced the colour noise, the luminance noise that remained spoke volumes to the detail that Fuji has been putting into their sensors/cameras. Especially once converted to Black & White, this is the closest thing I’ve seen to traditional film grain come out of a digital camera. So much so, that I will use higher ISOs on this camera for creative purposes. It’s that good.

Place D’Armes

Bank of Montreal

MTL_Dark-3

Statue in the Square

MTL_Dark-6

Notre-Dame-de-Bon-Secours

MTL_Dark-4

Ominous Entrance

MTL_Dark-5

Cobblestone Alley

MTL_Dark-7

Notre Dame Basilica – Exterior

MTL_Dark-8

Notre Dame Basilica – Interior

MTL_Dark-9

Candles and Crosses – Notre Dame Basilica

MTL_Dark-10

Heavenly Light – Notre Dame Basilica

MTL_Dark-11

Light & Symmetry – Notre Dame Basilica

MTL_Dark-12

From the Cheap Seats – Notre Dame Basilica

MTL_Dark-13

Flickering Prayers – Notre Dame Basilica

MTL_Dark-14

Gospel from Above – Notre Dame Basilica

MTL_Dark-15

Grandiose – Notre Dame Basilica

Old MTL – In The Light

PT.1 – Some daytime images from a recent photo excursion to Montreal. For this trip, I decided to pick up a smaller camera to take with me instead of lugging around my DSLR and lenses. After some research and testing, I settled on the wonderfully compact Fuji X20. I was originally leaning towards the Fuji X-E2 or perhaps something from the Sony NEX series, but ultimately decided that another interchangeable lens system sort of defeated the purpose. And I couldn’t be happier with the decision. The funky, retro-rangefinder styling coupled with a fast lens and great image quality is the perfect marriage of form and function for my needs. I’m not a big fan of the camera on my current phone (mostly because of a lack of control), but the X20 is small enough that it now comes with me wherever I go.

MTL_Day-1

Days of Old

MTL_Day-2

Above the Depanneur

MTL_Day-3

City Hall w/ Ukrainian Flag

MTL_Day-4

Old Stone Courtyard

MTL_Day-5

Layers of Age

MTL_Day-6

Age=Beauty

MTL_Day-7

Cold Day in the Old Port

MTL_Day-8

Morphing Trees

MTL_Day-9

Robocop?

MTL_Day-10

Seawalls and Grain Siphons

MTL_Day-11

Tight Squeeze between Port & Starboard

MTL_Day-12

Rusty Anchor

MTL_Day-13

Reflections of Bonsecours

MTL_Day-14

Five Roses

MNRD Studio Renos

Well, after a year+ of renovations to the basement following some water and (gasp!) mold issues, the studio is back up and operational. Rustic barnboard style laminate flooring, 5000k led pot lights, eggshell white walls and shaker-style trimmings. We are extremely happy with the results and looking forward to getting back to business.

MNRD_Studio-1 MNRD_Studio-4 MNRD_Studio-3 MNRD_Studio-2

A Battery of Batteries

If you use a lot of flash in your photography, you no doubt go through batteries like a fiend. In my experience, rechargeable batteries are definitely the way to go, but I’ve heard a lot of photographers complain about recycle time. I’ve sworn by (and continue to swear by) Sanyo Eneloop batteries for my flashes (AA) and RadioPopper wireless triggers (AAA). Sanyo recently released a new high capacity version of these extremely popular batteries (especially among photographers), and while it may seem like a good idea to upgrade in order to increase the recycle time of your flashes, it does, as one would assume, come at a cost.

Comparison:

photo01 The original Eneloops have a capacity of 2000mAh, can be recharged up to 1500 times, will keep at least 75% of their charge when stored for up to 3 years and come at a cost of approx. $19.99 for a set of 4 AA’s ($29.99 with a charger.) This means that I don’t have to keep track of, and cycle, my batteries in order to maximize their power and lifespan. And when you have 12+ sets of AA’s and 8+ sets of AAA’s, this just makes life a heck of a lot less complicated.
photo03 The new Eneloop XX’s boast a 2500mAh capacity, but only have a lifespan of 500 charges, only hold up to 75% of their charge for 1 year, and come at a cost of approx. $29.99 for a set of 4 ($39.99 with a charger.) For some, the trade-off of lifespan for power might make sense, but unless you do a lot of shooting at full power, it might not be worth it for the average shooter.

Conclusion:

I might invest in a couple sets of Eneloop XX’s for shooting in situations like bright sunlight where full power is often a necessity, but for most shooting situations where less than 1/4 power already produces fast recycles, I see little need to sacrifice lifespan, durability and $$$.

Tips:

1) If you have a lot of batteries and have a hard time keeping track of which ones are charged and which are not, consider picking up a couple of small, different coloured camera bags (point & shoot style). You can often find last years bags in discount bins. Also consider getting a green one to indicate charged batteries and a red or black one for discharged batteries.

2) I also carry a compact battery tester in case I need to double check the charge on my batteries. You can find these on eBay or at your local hardware store and average about $5.

(Note: Ironically, as I was writing this, I took a break to check facebook and SLR Lounge had just posted an article comparing the flash recycle times of many of the top rechargables batteries. Take a look at number one. Go figure. http://www.slrlounge.com/best-rechargeable-aa-batteries-flash-photography)

Kids are Colourful

So why not use a splash of colour to enhance their portraits! In the images below, I used Honl Photo’s Speed Strap and coloured gels on a Nikon SB910 (with the wide angle diffuser pulled out) to add a pop of colour to the background. I chose colours that would accent their personalities, clothing and eye colour. The lighting setup was a simple 2 light arrangement. The main light was another SB910 in a 26″ Westcott Octagonal Rapid Box (with diffuser panel) to camera left and at a 45 degree angle. Both lights were triggered by a camera mounted SU800 and the RadioPopper PX system (no line of sight required).

The key with kids is to try and keep it fun. Let them make some funny faces in return for some genuine smiles. It might not always work, but when it does, the results can be great.

Eli

Ben

Tips for (but not just for) Concert Photography

Last week, a former student emailed me and asked for some tips for shooting concerts, and seeing as I had just shot one the week prior, I figured now is as good a time as any to post some tips, tricks and pics (note to self: start a regular segment with that title.) Below are my ‘go to’ settings for concert photography. This tip doesn’t just cover concerts, but any low light event where there is any kind of movement involved, such as; Plays, Indoor Sports, Graduations, etc.

Tall Tall Trees

Tall Tall Trees | Live @ The Garrison | Toronto, ON | April 26, 2013

Here is what you need:

Equipment:

  • A high-end camera (just kidding. No I’m not. Yes I am. Well, kind of.) What you really need is a camera that handles really high ISOs with as little noise as possible. Sensors have improved by leaps and bounds since I first made the switch to digital in the early 2000’s and they just keep getting better. All this to say: if you have a newer camera, chances are you can push your ISO to its limits and still get reasonably clean images without the excessive noise that is usually prevalent with high ISOs.
  • An appropriate lens for where you will be located in relation to where the action will be, and how much of the stage you want to cover. For the shots below, I was right up at the stage and I still used a 70-200 lens so I could get in close. This will ultimately depend on what works for your situation and the gear you have available, but typically a longer lens gets you closer to the action. And that’s where we all want to be, right?
Tall Tall Trees | Live @ The Garrison | Toronto, ON | April 26, 2013

Tall Tall Trees | Live @ The Garrison | Toronto, ON | April 26, 2013

Settings:

  • Mode: Manual – This is a necessity so that your lighting stays relatively consistent.
  • Aperture: As wide open as you can get it to allow the most amount of light in. In other words, use the smallest f/number your lens will allow. Somewhere between f/3.5 and f/5.6 is typical for standard kit lenses, but if you’ve invested in better lenses, go as low as you can.
  • Shutter Speed: I typically start somewhere around 1/200 to 1/250 of a second to ensure that I freeze regular action on stage. Depending on how much or how fast the performers are moving, you may need to increase your shutter speed. (examples below)
  • ISO: As high as you need to go to get the right exposure. Typically in the 1600 – 6400 range. Will there be noise in the images? In the immortal words of Stompin’ Tom: Darn tootin’! Ask yourself this: “Would you rather have noisy images or blurry images?” Exactly.
  • Flash: Probably the most important thing here is to keep your flash off. It will do you no good. None at all. And it might just get you booted out of smaller venues if you’re distracting the band.
Lucius | Live @ The Garrison | Toronto, ON | April 26, 2013

Lucius | Live @ The Garrison | Toronto, ON | April 26, 2013

Just as an example to try and tie it all together for you, here are 2 situations that couldn’t be more different and the settings that you might need to capture each:

Example: Leonard Cohen

  • Mode: Manual
  • Aperture: As low as it will go
  • Shutter Speed: Potentially as low as 1/80 of a second because he doesn’t move much or at all.
  • ISO: As high as you need to go for a good exposure. Likely the lower end of the 1600-6400 range.

Example: Slayer

  • Mode: Manual
  • Aperture: As low as it will go
  • Shutter Speed: A minimum of 1/250 of a second to freeze all that thrashing around on stage.
  • ISO: As high as you need to go for a good exposure. Likely the higher end of the 1600-6400 range.

Here are a few more pics from Lucius and Tall Tall Trees Live @ The Garrison:

Lucius | Live @ The Garrison | Toronto, ON | April 26, 2013

Lucius | Live @ The Garrison | Toronto, ON | April 26, 2013

Lucius | Live @ The Garrison | Toronto, ON | April 26, 2013

Lucius | Live @ The Garrison | Toronto, ON | April 26, 2013

Lucius | Live @ The Garrison | Toronto, ON | April 26, 2013

Lucius | Live @ The Garrison | Toronto, ON | April 26, 2013

Tall Tall Trees | Live @ The Garrison | Toronto, ON | April 26, 2013

Tall Tall Trees | Live @ The Garrison | Toronto, ON | April 26, 2013

Burden of proof

(Disclaimer: I do not contend to know the law surrounding every aspect of photography in its nuanced entirety. The information below is my understanding of it and should not be taken as definitive legal advice.)

During a class this weekend I had a student ask about using/posting/selling pictures that have people in them; and the potential legal ramifications that can arise from it. While still largely untested, the general rule of thumb is this: If you don’t have a signed model release, you don’t have permission to sell the image for commercial purposes.

But it’s a little more complicated than that. In the US and Canada, you can use images taken in public places with people clearly visible for the purpose of photojournalism or Art. However, you wouldn’t be able to sell it on, say, a stock photography site, without a model release signed by each individual in the image. The reason for this is that you can’t control how the end user/purchaser will use that image. If it is used to promote or sell a product, and you haven’t gotten permission from the person(s) visible in the image, then it could certainly cause some issues. This is why stock photography agencies require a model release for any image that contains people. Here is how istockphoto outlines it:

‘ Ask yourself this: “Could any of these people depicted recognize themselves in this picture?“ If so, you will need a model release. Sometimes the context of an image is enough to make a person recognizable, even if their face isn’t visible.’

This requirement also stretches beyond stock photo sites. Most (if not all) photo contests require a model release in order to enter an image into competition. The reason here is quite simple. If that image ends up in the top of the heap of submissions, the organizer will more than likely print it and/or use it for promotional purposes, all for which you would ultimately need a model release.

Here is a real life example… During an eSession last year, we were on a boardwalk taking pictures of the couple on a bench when a group of officers walked by on foot patrol. Inspiration struck, and we asked one of the officers if they would pose and pretend to write the couple a ticket while they made out on the bench. Caught up in the moment (or perhaps subconsciously not wanting to push my luck), I didn’t think to ask the officer to sign a release form, even though I felt we had potentially captured something unique and special. Even though the officer’s face isn’t visible, because I didn’t get a release signed, I’m unable to submit the image below for consideration in contests.

No model release. No contest submission.

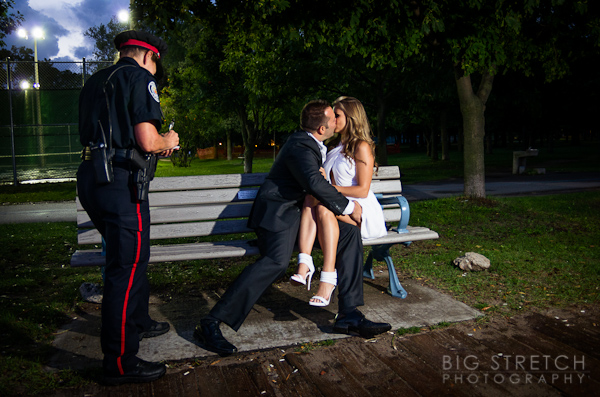
No model release. No right to sell (commercially) or submit to contests.

Fong on a Stick

I’ve been using this relatively simple little lighting setup while shooting on location for a while now and have suggested it to a couple photog friends. After trying it out, most of them come back singing its praises, so I figured I would pass it along here as well. This is an extremely easy way to add dimension and direction to your light, all the while diffusing it for a softer effect. I call it: Fong on a Stick!

Now, I know some people curse the dreaded “tupperware bowl” that is the Gary Fong Lightsphere, but there are also those who swear by it. I happen to fall somewhere in between. Is it the be-all answer for diffused lighting? Not even close! Do I like walking around an event with a big white bowl on top of my flash? Not at all! Do I like the results I get from it? Obviously. Otherwise why would I be walking around with this stupid thing on my flash?

The issue that most people have with the lightsphere is the cost ($70 for a plastic bowl, some velcro and a rubber band?!?!). I like to try and build my own “knockoff” of a product using inexpensive materials before laying out $50 or more, but this is one of those things that I wasn’t able to quite get right. The ridges inside the lightsphere serve to spread and diffuse the light in a way that I wasn’t able to replicate in my homemade attempts, so I ended up forking over the $$ to buy one. And it just so happens to be the lynchpin in the setup below. I guess that is stating the obvious… It would have been weird if I called it Fong on a Stick and then used an umbrella.

Here’s what you’ll need:

  • External Flash
  • Gary Fong Lightsphere
  • Monopod
  • Wireless flash trigger or built-in flash capable of triggering an external flash
  • Small flash stand (if using built-in flash for triggering)

Simply thread the flash stand (pictured above) or wireless trigger to the monopod and attach your flash to it. Then mount the lightsphere on to your flash. Have an assistant hold the contraption and direct them as to where you want your light source to come from. If you don’t have someone available to hold the monopod, you could could always substitute it for a tripod (but that isn’t quite as versatile).

The end result is a magic light stick capable of all sorts of creative lighting. In fact, all of the images in this previous post – https://mnrdphoto.wordpress.com/2012/08/12/esession-michelle-george/ – were taken using this surprisingly flexible tool.

The Back Up Plan

Do you have a back up plan? No, not the kind where you and your bestie pinky-swear that if neither of you is married by the age of 40 you’ll marry each other. I’m referring to the more attainable kind where you protect your images from becoming trapped in the cellulose nether reaches of a fried and nonfunctional hard drive.

Here’s the deal. If you only have your images stored in one place, it is a recipe for disaster. You are, simply put, asking for trouble. If you haven’t had a hard drive fail on you, you simply haven’t had a hard drive fail on you yet! Now, I didn’t go looking for actual statistics, but I’m sure that one in every two people polled would say they have had a hard drive fail on them and they lost valuable documents/photos/videos, etc. DON’T LET THIS HAPPEN TO YOU! Back up your photos! Gone are the days of being able to take the negatives back to have more printed. If you lose your images due to hard drive failure, well, to paraphrase Jack Handy, “It’s like dropping your keys into a river of molten lava… let ’em go, because man, they’re gone.”

There are a few ways to go about this, but the most common process is first:

  • External hard drives are relatively inexpensive (I just bought a fast, brand name, 3 terabyte drive for $200 yesterday), and are easy to install. Just plug them in and voila(!) extra storage or back up ready to use. So there is really no excuse for not doing this.
  • The Cloud is still a little too esoteric for a lot of folks to truly embrace. A mystical area in cyberspace where all of your files are redundantly kept in case of a catastrophe. My biggest issue with it would be the overage fees from my service provider for uploading terabyte upon terabyte of information.
  • CD/DVD for back up is becoming less and less viable with the larger megapixel (i.e. larger file sizes) cameras of today. You can only fit so much on to each one, which makes cataloging a chore.
  • Memory Cards are a simple alternative to having to back up at all. Although I don’t recommend it, I know people that buy inexpensive memory cards then simply keep them as their back up after they have downloaded the images to their computer.

Beware the Pretty Little Liar…

…On the back of your camera… AKA: Your LCD screen!

This applies to all camera LCD screens, not just Nikon. Please don't sue me.

First of all, I recommend shooting in RAW and developing in Lightroom to just about every student that takes one (or more) of my classes at Henry’s School of Imaging. The amount of information that is retained in a RAW file is staggering in comparison to the alternative; jpg.

The other night I had a comment from a student who had attempted to shoot RAW when they first purchased their camera, but promptly switched back to jpg. They complained that when they first took the picture, it looked amazing on their camera’s screen, but when they imported said picture into Lightroom, it suddenly changed and became bland and boring, leaving them with their work cut out for them when developing their image.

The reason this happens is that with every RAW image you capture, a jpg preview is created along with it. This jpg preview has the same processing that the camera would have normally applied, as if you were shooting in jpg to begin with. The reasoning behind this is so that you can preview your RAW images using any number of programs, even though they can’t necessarily edit the raw data. For instance, on a Mac, you can see your RAW images using Preview, even though you can’t actually edit them using that program. Think of it as a large thumbnail preview.

Simply put, you should always try and get the exposure right in camera; even (especially) when shooting RAW images. How do you do this effectively? By using your histogram, of course.

The moral of the story? Your LCD screen is a compulsive liar and can’t be trusted, but the histogram never lies!